Translator

Tuesday, October 30, 2012

Time Flys When You Are Having Fun

 
It has been ages since I last posted.  Would "BUSY" be an appropriate word to use here?  So much of my late spring and summer was taken up with activities involving baseball and my grandson Axel.  He is a baseball playing machine.  He was on a Babe Ruth Minors team in the Spring, made the All Stars and his team came in 4th in the state of Colorado for their age bracket (10-11 yr. olds).  Then it was on to Summer Ball.  Once school started we let him sign up for football.  This was a first for him.  Not sure he enjoyed it all that much - too much contact against his position of running back.  He also got an offer to be on a competitive traveling baseball team that will practice all winter to be ready for spring and summer tournaments in 5 states.  Of course, it was a major decision making time in our household as this requires some traveling monies, etc.  In the end, his father said OK and he began practicing with the team in September.  Football is over and we are still in baseball mode.  Did I mention I LOVE KID'S BASEBALL?  It is a thrill to watch Axel excel in the same sport his father did as a youngster.  He is actually having opportuniy now to do what his dad didn't do until he was 15.  As long as his grades hold up and he is happy to play we will let him enjoy the ride.....

We also took our annual summer trip to LasVegas.  Great fun as usual.  I waslucky and brought home some of their money.   I put the money in my STASH budget and took it with me to the CQI Retreat in Utah in September.  Got to visit with many old and new friends.  There were some great workshops held on Color Theory, flower making and such.  I taught one on how to make bracelets from strips of torn fabrics, wire, beads and funky fibers.  I also got some good buys at the vendor tables set up by the other retreat participants.  I may have picked up a couple of pouonds eating the tasty offerings of Gerry K. who acted as chief cook for the lot of us.

We went shopping one day at Shepherd's Bush and a local needlepoint shop.  I used that Vegas money wisely to buy books, books and more books.......and of course some other stash to make stuff  I saw in the books!  Connie warned me that there might not be enough room in the car on the way home to bring back what we had both bought but we managed to get that car packed and not a book, a ribbon, a piece of fabric or a bead had to be left in Utah!

In early October I took a workshop at the Pikes Peak EGA Chapter's meeting.  We learned wool on wool applique methods and made a darling candle mat.  I really liked learning about the 2 different fusible interfacings the instructor used in the project.  This was also a chance to brush up on my Blanket Stitch and French Knots.  If you have not tried the nylon tricot interfacing you really should!  It leaves the fabric just as drapable as before the interfacing was applied.  I L-O-V-E it!!  Here is a picture of my completed candle mat.


Rocky Mountain Crazy Quilters arranged for 2 workshops with Hellen Gibb.  Helen is a master at making Ribbonwork Flowers.  In the morning class we learned how to make the full blown rose out of wired ribbon with the prairie point leaves.  This is a great flower for a corsage, to put on a hat or a tote.  You could even put a stem in it and make a vase of life sized roses.  We also made the life-sized pansy and leaves from a scalloped ribbon.  Pansy is one of my favorite flowers so I will be using this many times on future CQ blocks and gifts for friends.

In the afternoon class we learned the carnation (lots of fraying of ribbon allowed), the small gold rosette with a knotted center.  I have alredy mde more of these and put them on hedbands for Grace and Belle. a really fun and beautiful flower was the flat rose made from velvet ribbon.  I have seen this flower made out of satin and similar ribbons but handling the velvet ribbon was a challenge. We put that rose into a Hanna Silk ribbon rosette on a crinoline base.  I think I am going to remove the ribbon rose temporairly to put some stamens in behind it, allowing them to lay into the gathering folds of the rosette.  Then I will place the velvet rose back where it belongs.  Not sure yet how I will end up utilizing this particular flower but I do have a hat that looks like it might be a good display place for it......h'mmm.  Here is a picture of what I made in the classes with Helen.


Of course there have been many other things taking my time away from blogging.   Wrote a new Redwork Course for StitchMAP over the summer and am curently mentoring over 15 for that course.  They are in turn mentoring another 25 between them...what a great group of ladies.  I did spend some of my late spring and early summer embroidering quite a few samples for photos to be used in that course.  I also managed to complete some embroidered some tea towels and begin basting of another EGA project which I will be taking a workshop on in the spring.  The workshop will be on how to assemble the project once it is stitched.  Hint:  It is a mathematical puzzle of construction techniques.  I will post photos and reveal that secret project next spring.  Hopefully, I can find time to post again before then........  How do the ladies who post every day or even once a week find the time???  I feel so inadequate, lol.

Now it is time to get back to my mentoring duties and writing more Challenges and classes for StitchMAP.

Shari

Monday, May 7, 2012

April CQJP2012 BLock

I was a tad late getting my April block sent to Kathy but it is finally done. I learned, actually relearned several things while working on this block.

I wanted to do some things on this block that I haven't done for a couple of years in the way of texturizing my embroidery. I have done some needleweaving, cast-on stitches, and some needle wrapping that is traditionally done in Hardanger fillings. I also wanted to revisit bullions and shisha. For my personal "challenge" I decided to utilize some objects found around the house as a base for the texturizing to add depth.
So, here was the prep plan. First, collect fabrics to build block. Second, find some plastic 'thingys' like bone rings, washers, etc. to cover with stitches for focal points. Third, prepare a shisha mirror to be attached later. Fourth, find some long unused fibers to do the stitching with. Fifth, construct block with logical sense of order. That WAS the prep plan.

First thing I learned is to never forget the plan! I gathered together many different possible sky/space fabrics and settled on the one shown which was a batik that Kathy Shaw had shared with me when I visited her in February. The yellow planet fabric was chosen to provide a bright contrast to the sky. I knew I needed another planet to help establish a sense of depth to the block. So, I found the orange orb which had been machine stitched on a piece of organdy and given to me by a friend several years ago. There were several different colored combinations done by her on one small piece of cloth. I simply cut this one out very close to the stitching and couched it down to the sky. I thought it was fine and it was a cool complement to the blue in the sky. Mind you, I did this BEFORE placing the yellow shisha planet down....not badddd but not gooood either....out of order.

I appliqued the top planet edge down over the blue and the muslin backing. Then, I stitched the bottom edge down with the machine all the way across the block - below where the 'actual seam line'' should be. Uh oh! I forgot to do 2 things...trim out the excess blue fabric and put in my batting for giving the planet some dimension and cushion. Pull out the stitches, lift back the planet, trim out the excess fabric, clip the curves (forgot that too), insert the batting and stitch the whole thing down again with the sewing machine (which we all know is not my favorite tool). LOL.

Then, I began to choose the threads I would use for my embroidery. I started with a Caron's Watercolour over-dyed and then selected a Thread Gatherer's overdye that had some similar tones to it. I chose some Racheltte cream colored rayon tubing with a gold cord down the center for some of the accent work and a very very dark purple contrasting rayon tubing for an additional fiber to use with it. I pulled several different sizes of gold, clear crystal and brown toned beads for accents. A bright egg yolk yellow tatting thread was pulled to do the shisha with. Other fibers were tatting thread, perle cotton and DMC floss. I was good to go......so I began with the shisha.

I should have made that sucker directly on the sky and not bothered to make it on muslin first. It was a pain to cut out and then I had to add another row of very tiny stitches around the outside of it to hold it down where it is placed now. I was forced to admit how bad my eyes are getting and how I am going to have to invest in a new pair of glasses if I want to continue to work in such small stitches. Arrggh!
The next day that I stitched on it my son was walking through the room and he noticed a brown sheer fabric sleeve on a blouse with printed lines on it laying in my thrift store clothing pile. "Wow, Mom. Are you going to add this for a gas cloud on your planet? Cool!" Well, of course I wanted to be cool so I said I was going to do just that very thing right then. I held the sleeve across the width of the block, threw on 2-3 more inches for good measure and cut the sleeve right off that thrift store blouse! I twisted it this way and that until I got the lines to swirl just the way I wanted them to go and still have some loose puffs to show it was a 'cloud'. Next, I proceeded to whip it down with the finest of stitches so as not to tear the sheer fabric. I stitched it top and bottom...tight! I am very happy at this point because I think it has solved the problem I had been thinking about - how many hours would it take for me to fill that whole piece of yellow fabric with texturizing stitches? Would I get done before the end of the month? I was feeling real smug. I had just filled over 1/2 of the planet with a gas cloud.

WAIT! Now I am ready to begin the planet embroidery and I realize I have neglected to put my plastic rings under the fabric and they need to be on the batting! AND....I really don't like the plastic things I have chosen anyway. So, I call my dear friend Maggie and we take a trip to the hardware store. We look in drapery/curtains....cheap plastic O rings is all they have. We look in the plumbing department...rubber everything! Will it deterioriate over time? Will it leach oil into the fabric? Why am I even looking at it? Most of it is black anyhow! Yuck. It will show through the fabric. So...I grab a young man by the arm and beg him to tell me where the washers are...not wash machines! He takes me to building supplies and in a bazillion little drawers back there they have all kinds of metal, rubber, wood and acrylic "thingys". He points out that I can buy them individually or by the package and how to tell what is what in the drawers for pricing purposes. I LOVED this kid! He didn't even laugh when I told him I was going to use them for sewing purposes.

About an hour later and only a couple of dollars poorer, I took Maggie home and went back to my house to finish Planet Sorry Shari (as my grandkids were now calling it). I bought acrylic because it was a light cream color and truthfully had the best selection of sizes and shapes except for the metal ones. The price range was from less than 25 cents to about $1.80 each - so it was just a matter of choosing something that would fit the area I had available to put them on. Of course, I bought extra while I was there......wouldn't everyone?

The next time I picked up Planet SS I realize I still have to sandwich those "thingys" between the fabrics. I take out the planet's top edge applique stitches and slide the rings into place, not sure at all that they will stay where I put them. I load a needle with sewing thread and try to put a tacking stitch on them from outside the ring to the inside and then tied off on the back. Pray it will stay because I already see a new problem. I don't have enough slack in my planet fabric to accommodate the rings nicely and still allow me to put the planet edge down without getting a bumpy horizon line. I have clipped the curve underneath awfully close. Talk about your nail biting efforts to get that edge turned under and as smooth as possible....it is what it is now! I am frustrated with it but my DD Moon says it looks fine, because nothing is ever perfectly smooth in space, too many crater pockmarks. I rasied this genius so she must be right! I move on.

I made a mistake with that dark purple rayon and I know it. I decide to take it out and try something else. The rayon leaves large holes in the fabric when it is removed. I have to resort to using 4 plies of embroidery floss to fill the hole. I add a bead to cover the center hole in the ring because it is pretty much useless fabric in the hole as the rayon left large holes there too and they are too close together to fill nicely. I cover the bead in floss, put it on the washer center and proceed to lay the foundation for the needlewrapped 'volcano'. By now I am sure the aliens that inhabit this planet live down that hole. They have zapped my creative juices right out of me and I just want to get done. The bullions, cast on stitches, French knots, needleweaving and beading all go fine over the next few days. I create the needlewrapped bars on the volcano as I go along and am rather proud of how that turned out.
I showed the block to Maggie and her dear mother, Dixie. Dixie is a mentor of mine. They truly seemed to like it. DONE! I ship a picture off to Kathy after adding one last flat backed bead in the sky for a third planet. I no longer have fantasies about going into space. I know it would be a difficult place to live because nothing goes as planned there! I think I will stick with more realistic landscapes for the rest of my journal pages.

I hope you like Planet SS. Remember -- Never Forget The Plan...unless you forgot to plan........

Hugs, Shari

Sunday, April 15, 2012

Butterfly Pin

Saturday I attended the Pikes Peak EGA Chapter's meeting. Our workshop was a beaded pin class taught by Caroyn Sherman. Carolyn is a member of PPEGA and she is a national beading instructor for EGA, often teaching at seminars. I am happy to call her a friend and mentor. She is always willing to help fellow stitchers and beaders.

Here is a picture of my completed project. The beading went smoothly and I really like having a workshop project that can be completed the day I start it rather than one that takes forever after the meeting to complete.


Isn't it cute? If you ever have an opportunity to take a class from Carolyn I would highly recommend that you do so.

Hugs, Shari

Wednesday, March 28, 2012

Everything IS BIGGER In Texas

The last week of February DH and I loaded up the trailer with all the collected needlework stash donations and we took off to deliver them to the ladies of Bastrop, Texas. You can read about the Texas Fire Relief Effort to help the sitchers of Bastrop and the surrounding communities over on the Stitchmap blog here.

The first day on the road we stopped for dinner at a wonderful restaurant. They advertised delicious food and a fun time. We weren't disappointed on either count.

One of their claims to fame is the free 72 oz. steak. It is free IF you can eat it all and all of the trimmings, too. I sure hope this fella didn't wind up on someone's plate the next week. He would have been pretty tough!


Of course, after wrestling with that steer I had to take a leisurely swing on the front porch in the warm evening sun before going inside to eat some vittles!


I was so full from the delish dinner (chicken fried steak, yummy!)that I just had to sit for a while in this rocker to let it digest. I can't put into words how tiny I felt in this rocking chair! But, let me tell you this...it was a good feeling, lol. Perhaps the fella (it would have to be a man) who could eat that 72 oz. steak would fill up this chair but I felt like a flea in it.


We did consider staying at the hotel across the street for the night but it was a bit too rustic looking for me! We traveled on to keep our reservations a little further up the road.


I really want to thank the ladies of the Bastrop community for their hospitality over the next few days. We were treated to a reception at the home of Debbie H., taken on a guided tour of all the lovely shops downtown by Debbie and Lyn G., and we were invited to the Best Little Quilt Show in Texas on Friday in La Grange. I bought way too much at the vendor's booths there. The area's antique shops were also wonderful. My pocketbook got a bit lighter after I visited a few of those, lol.

I was inspired by the members of the community that I had a chance to meet. Everyone was gracious and friendly. The people of Bastrop really pulled together to help each other after the wildfires and they obviously know how to fill those big boots we always hear about. I was impressed with everyone I met and everything I saw.


Hugs, Shari

Thursday, March 15, 2012

March CQJP 2012 Block


This is the third in a series of landscapes I am doing for the CQJP 2012 project. I have entitled it Last Snow on the Prairie. The inspiration came from a recent snowfall that occured here in Colorado. Our prairie is actually high desert and the snow never hangs around. Instead, it blows around in the wind and disappears almost overnight most of the time. I wanted to capture that feeling of the rolling hills prairie dusted with snow and the newly greening century plants.

The mountains are cut from decorator upholstery fabrics and singed over a candle flame. They are stitched down using gold metallic Kreinik #4 fine braid. I am fond of the way these decorator fabrics give the impression of ridges and valleys. They frequently have different areas of texture and that always intrigues me...I am a texture junkie! The 'prairie' is a piece of drapery fabric from a sample book and it is covered with a piece of fine tulle lace curtain rescued from a thrift store. The sky is an old sheet I dyed and the patches of snow are motifs cut from yet another lace curtain and placed under the first overall piece of snow lace. I did purposefully leave some puckered up fabric in the center of the prairie to work around, hopefully it was going to simulate the little drifts of sand and dirt that are out on the grassland. I think it was fairly effective.

I used 3 different types of funky yarns for the tree line at the base of the mountains. The first is an olive green wooly type that I stretched out a bit and put down in about 3 places before covering it with the dark green chenille type fiber that simulates the pine tree that border a lot of our hills. I mostly used fly stitches to hold these fibers in place. The last fiber is a brown/tan/dark brown metallic blend that sets right underneath the dark green. It adds depth to the block and begins the sparkle of the snow. I also used a blending filament from Kreinik to randomly wrap and tack the tulle lace to the foundation. It doesn't show in the picture too well, in my opinion. But, it is sparkly like ice crystals in person, I promise, lol.

The gully grass is another funky fiber that is rather 'fringey' and grasslike. I used a double row closer to the middle and front of the block. I tapered it off to a single strand nearer to the mountains to show distance and perspective.

Several people have asked where I find these fibers. Most of them are purchased at yarn shops as specialty yarns on the ball. I have also then at needlework shops on long display cards. These cards usually have 6-7 different types of funky fibers wound on one card, in about 2-3 yard lengths, which is more than sufficient for several projects. However, I like to send these fibers out in Swaps with my sister stitchers so I usually buy the balls of fibers/yarn at the yarn shop so I have plenty to share. It is amazing the collection you can acquire through swaps and you can afford to be generous by sending along a couple of yards or more because you will never use up all that is on most of those balls! On occassion I have found these fibers at the thrift stores also - for pennies on the dollar. Also available at the thrift store are scarves already knit from these fibers and I have even been known to unravel some of the wonderfully soft scarves because I could get the scarf for 50 cents - $1 and there is a lot of funk in one scarf, ROFLOL.

The distant trees are perle cotton and/or DMC embroidery floss for the most part. They are done in feather stitch, chain stitch and wrapped chain or straight stitches. The main tree is a selection of about 6 funky fibers in browns, black, grey and tans. I believe there are some eyelash yarns, chenilles, silky ribbon types and some corded eyelash types in the mix. I also added in several pieces of #8 perle cotton. I nevercount the number of threads. I usually go for color and the size trunk I can twist with what I have pulled out. If it is too small for the project I add more. If it is too large I put a few back in the drawer. I twisted the fibers together a little like one would wring out a rag. I then pinned the trunk portion down to the block with straight pins and proceeded to splay the loose ends into roots and branches, always working the thicker threads backward into the branch or trunk when I needed to go forward with just the thinner fiber for the tapering brnaches. The outer branch/twig system is single strand overdyed embroidery floss in feather stitching. There are some things to consider when making a tree. For instance, nothing needs to be perfectly smooth because most barks are not, so feel free to tack the fibers down with strong stitches that will pull the fibers into nooks and crannies. Remember that the new growth at the end of the branches is tender and usually greener or lighter browns than the rest of the tree because they reflect the light more readily. Lastly, when adding the feather stitching try to add some along the side of the branch and not just at the ends. These would bcome next year's midsized branches.

The snow was added along the branches and into the V crevices by using tiny snippets of #12 and #8 white perle cotton couched down with white floss. In some cases, like the distant trees, I even used just floss in varying plies to add the snow to the trees. My husband suggested that the bark was rough and therefore, would catch snow in the crevices in the wind, so I added some to the trunk of the main tree and I think his suggestion was spot on. Generally, I do not stitch these snippets through the fabric bcause it wears on the fibers so much. I just snip them and couch them down and pierce them with embroidery floss to securely hold in place.

The century plants stay on the prarie year around here in Colorado. They are always in different stages of maturity. New growth is light green and as the plant ages the spike knife-like 'leaves' get darker and darker until they turn brown. The spike of white pod-like flowers are dried and turn toa woody brown by late summer. They stay dark brown throughout the winter, often falling off the plant in the wind. So, I added French knot 'pods' on a single spiked stem to some, but not all, of the plants. I also tried to make the plants seem more distant by making them decrease to a smaller size as they neared the mountains.

The finishing prairie elements are the rocks added to the gully and to the base of the tree. I began by making 3 stumpwork rocks from wadsof rust dyed cheesecloth. It was fun to stitch these in hand and then when attaching them to the block I took a couple of tight stitches on them to give them dimples/ridges. They are so small it doesn't show in the photo real well but in person, against the ultra smooth real rocks I stitched down. These cheesecloth rocks look very weathered and I really like them. I expect to use this technique again on future blocks.

The final step was to add some clear sequins and some seed beads to the snow patches to make them shine a bit like glistening snow. Again, the lighting when taking the photo, does not show this to the best effect but it is definitely there.

I enjoyed doing this block very much. I was stitching snow onto that tree all the way from Indiana to Kansas! Thank goodness DH stopped at the Russell Stover chocolate candy factory in Kansas. I got distracted and the block didn't get to looking like a blizzard had hit, lol. I think I must go get another piece from the box now.

Thanks to everyone for their kind comments regarding the series I am doing. Your support is a powerful motivator.

Hugs, Shari

Wednesday, March 14, 2012

February CQJP 2012 Vineyard Block


This is the second in the landscape series I am stitching up for the CQJP 2012 sponsored by Kathy Shaw. Click the button on my side bar if you would like to see more beautiful blocks from all over the world.

I have tried to create the feeling of looking down on the vineyards in Northern California. The scene was inspired by two different things. One was an advertisement for wine that I saw showing a landscape of vineyards. It had a large glass of wine overlaying the scene and the colors caught my attention. The ad also inspired me another way and now the glass of wine is gone, lol. secondly, I have family members that live in the northern part of California so I have visited the area a few times. This is supposed to be a composite of things I remember most from that scenic area. I hope you all get a similarly good feeling after viewing this block and that it might inspire you to visit the beautiful fields in California's wine country.

Here is a little bit about how I went about creating this block. Keep in mind that the construction and piecing was done at home and the stitching was all done as I was traveling in a truck on my way to Bastrop, Texas to deliver the Fire Relief Donatons. I had to do some stitching that didn't require percision so the stiches used are very simple ones.

First I chose my sky and mountain fabrics. Then I placed the sky fabric down on my foundation muslin. Next I worked on developing the rows of 'dirt & grape vines'. For this block I had a minimal amount of fabric available to me to use for those rows and I had to decide how to get as much use out of it as possible. I wasn't going to be able to seam the strips together and have enough fabric to make the width of the block even. To remedy that I threw in a wider strip of fabric for the dirt road. I would have liked to have a bit more of a vanishing point for the rows and the road but my fabric shortage dictated a wider vanishing point line. I also had to plan on how low to set the strips and still get a properly placed horizon line. You will note that the horizon line tilts a bit to the left, as do the rows on the left side of the road. I hoped this would give you the feeling of being on a rolling hill side. I wonder if I succeeded?

I butted the strips up to one another (much like you would do when working with wool patches) and I basted them in place at the bottom of the block (allowing for my seam allowance) until I could figure out the mountain placements.

I cut the mountain shapes free hand with the rotary cutter from batik fabrics. Once I had a pleasing arrangement I pinned them in place and determined the direction the light would be 'coming from'. I used cotton embroidery floss throughout the stitching on this block. The mountains and the final row of chain stitches on the vines were done in over-dyed flosses. Feather stitches were used to highlight and texture the mountains and the road. I joined the rows by using a tiny blanket stitch for the first layer of stitches and at the same time I added my very fine black tulle for the shadows between rows and on the road. The vines are built up in layers of fly stitch, chain stitch, fly stitch again and more chain stitches to give some depth to their appearance. I used a varying number of plies of floss for this so there would be some texture throughout the vines.

The next step was to creat some distant trees using elongated fly stitches and some whipped backstitches for the trunks and branches. In front of those I placed some irregularly spaced long straight stitches for the hint of some fencing. Over that I laid a long strip of a funky wooly fiber that I tacked down - hoping it would look like a bank of bushes. The tree tops on the larger trees are made from a multicolored yarn that I pulled apart and distorted. It is held in place with tiny fly stitches to simulate branches. Somethought was given to placement of the lighter shades of green so the light direction would remain constant. The smaller trees have some shredded/pulled cheese cloth foliage.

when I am having a day of plaing with dyes I use snall rags/swatches of cheese cloth for wiping up any spills, cleaning out my dyeing bowls/jars, etc. I heat set the colors with the iron. I keep the rags and then use that cheese cloth for lots of things in my needlework. It is a fun and easily controlled fabric to work with in this manner. You can get some pretty ugly and dirty looking swatches but they tear off into great pieces for use on trees, as rocks, seaweed, etc.

The last element to be added to the block was the beading along the vines. I used a mixture of seed beads in golds, pinks and purples to simulate grapes ready for harvest.

I am pretty happy with the way this block turned out considering I had to do most of the actual stitching in the truck. DH was really good about letting me use his side of the cup holder for holding my scissors, needle book, etc. I used my cup to hold the floss cards. It sure made the time pass quickly on the ride to Texas.

Hugs, Shari

Sunday, February 12, 2012

Crazy Quilts Are Quilts Too

Have you visited the Crazy Quilt Show on-line at Pigtales and Quilts? There are some wonderful examples of CQ entered in a contest on this site. The creators of the CQs are waiting for you to come look at their work. You can actually vote for your favorite and help some lucky CQer win some fabulous prizes. There are also some wonderful CQ enthusiasts who have linked to the site and you can visit their blogs to feast your eyes on even more eye candy. You can win prizes yourself if you link up right away. Only a few days left.

Also of interest to those loving CQ would be the Crazy Quilting Journal Project (CQJP). Over 200 ladies and gentlemen from all overthe world have registered to participate by sharing a completed CQ block/project each month for 12 months. The works shown so far for January and February are outstanding. You will find a link over in my side bar.

Enjoy the sharing going on at both of these sites and consider participating in one or both of them next year. In the meantime, check them out and try to contain your drool.

Hugs, Shari

Saturday, February 4, 2012

CQJP 2012 January Block

I did it! I actually found time to finish a block in a month. As a committee person for the project I thought I had BETTER find the time or I wouldn't be in any position to encourage others to do so, lol.

I have entitled this block Inside Neptune's Garden Net. I hope it gives you the feeling that you are under the sea, inside the golden net of Neptune with those 3 large fish, looking for a way out through the seaweed.


When I decided to participate in CQJP 2012 I thought it would be an opportunity to challenge myself a bit with each block by doing something that I hadn't done before but might have wanted to try. I also decided it would be a good time to revisit some techniques that I hadn't done for awhile.

On this particular block the challenge was to work with that gold netting. I can tell you it was a true challenge to get it to lay on the fabric and not curl the fabric right back up because the netting has a 'memory'. It was a gold net bag that had held some chocolates. It expands well when full but it retracts to its original condition when not full of chocolate, evidently, lol. I had only the corners and the side points tacked down and I thought that would hold the netting open. My initial plan was to stitch all the seaweed elements over it to hold it in place - the next morning. When I picked up the block the next day it was all rolled up inside the netting. What a tangled net we weave....lol. So, I spent the better part of the afternoon that day tacking that netting in place from the center out on the fabric. I fought with it like crazy because it really wanted to keep retracting back to its tight bag shape. Does this make it 'crazy' quilting?

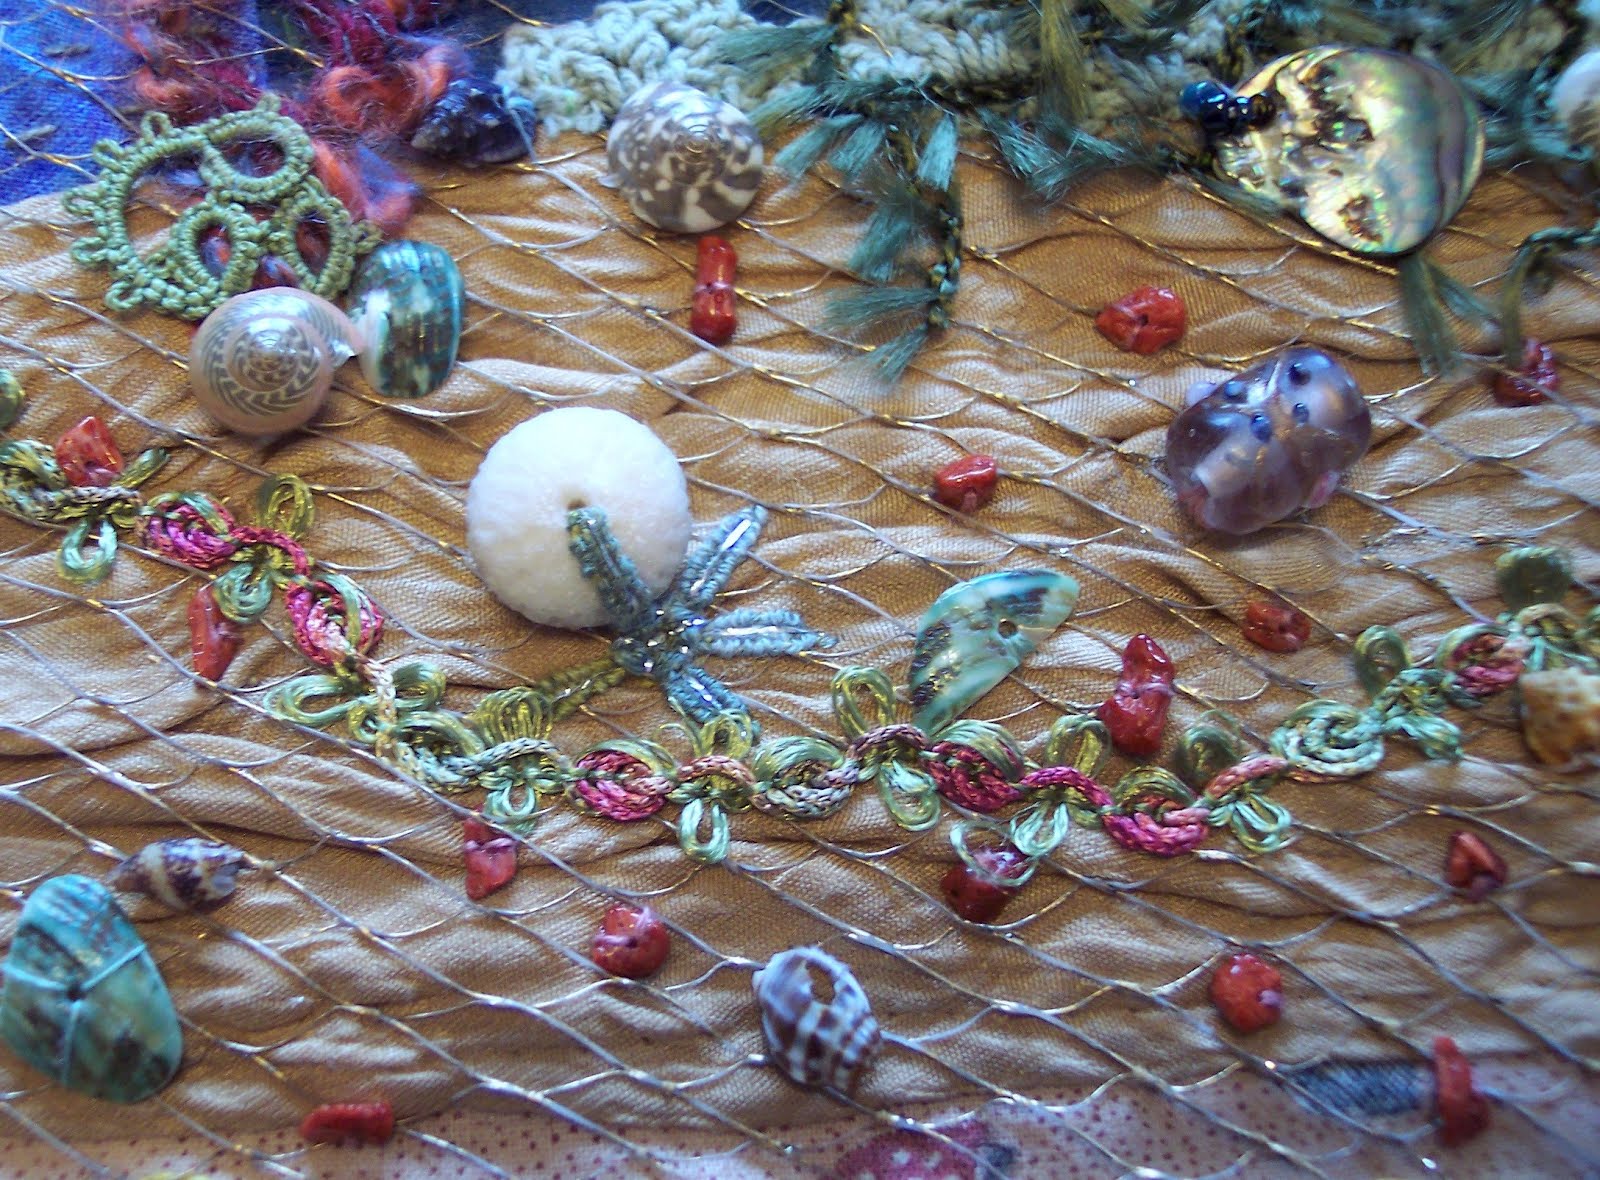
One of the techniques I revisited was stenciling the distant fish onto the fabric with Shiva oil paint sticks. I even cut my own indistinct stencil. I really like the effect of depth it gives to the block. I laid a lot of dark seaweed on both sides using scraps of yarn, perle cotton and other funky stuff. I used a lot of feather stitches, fly stitches and some of the fibers are just laid on with couching stitches. I also tried my hand at scrunching a large piece of fabric for the sand and tacking it down to retain the pleating. I just love scrunching fabric. Then I laid the netting, the fluffy/bushy central seaweed and the seashells, coral rocks, skull and blown glass bead.


I decided to use needle weaving for the legs of the starfish holding the shell down. The center is a very tight buttonhole and cross stitch, with silver blending filament accents to make it show up a bit more. I love the vintage trim that winds its way across the ocean floor. The sand dollar is cut off a necklace from the thrift store, as is the skull by the seaweed on the right.


The 3 large fish are also thrift store jewelry parts. They are mother of pearl cut from an abalone shell. I used some rose petal motifs from some old dyed lace curtains for their tails. I trimmed one petal down a bit to fit under the body so I could tack it in place before setting the fish body in place over the lace. The veins in the tail are also silver blending filament.

I hope you enjoyed this part of the journey. I have begun my February block. It is pieced and I have some ideas but need to pull the threads and other embellishments before I can start my stitching.

Hugs, Shari

Monday, December 19, 2011

Chinese Auction Fun

My friend Connie and I went to a Holiday Luncheon last Saturday. The members of the Rocky Mountain Crazy Quilt Association celebrate each December with an afternoon of cheer and fun instead of the regular business and workshop meeting. This year we participated in a Chinese Auction. Each person was to bring a white elephant type gift for exchanging.

I took a Bootie Bag filled with stash items that a crazy quilter would enjoy. In return I received a lovely fabric and lace lap quilt. It was made by Leah Mae Williams in 1996 and was brought by Holly. She tells me she originally purchased the quilt at a craft show. The quilt is so sweet with such great blocks that I have no idea why she was willing to give it up. But, I am glad she did!


Each block has a different design done using lace and/or some patches of manipulated fabrics. The colors are white, off white, and the palest peach tone with black satin ribbon accents. The whole thing is very nicely handquilted. It is amazing how uniformly the hand quilting is done. Here is an example of just one block.


Click on the pictures below to see the details of each block. There are some neat techniques shown. I am particularly fond of the way the corner of a hankie was used on the fan, the use of prairie points on another block, the various ways shirred or gathered fabric was used on several blocks and the use of the crocheted lace on the cuff of the lacey glove. The lace inserts on the basket of flowers is pretty cool, too, as is the use of the lace rosettes on the blocks. Every time I look at it I discover something different. I keep discovering different types of lace that are actually being used, too.


Sunday, November 13, 2011

Saturday, July 2, 2011

Booty Bag for Connie

When I went to Las Vegas in the late summer of 2010 I bought some beautiful peacock feather appliques. I gave one to each of the moderators of Stitchmap and challenged them to make a swap item. I also participated in the swap. The swap coordinator was my daughter Moon and it was her job to keep us all on track.

Moon assigned us swap partners, setting a 6 month due date for the swap to be completed. Like most of the others I procrastinated. The major obstacle for me was thinking of a gift that was useful and that could carry off the peacock theme. Imagine my surprise when Moon sent me Connnie's name as the one I was to make this swap gift for. Now I was feeling pressure. I had to keep it secret and we pal around all the time! How does one keep such information from a good friend when that friend keeps wanting to talk about the swap and exchange ideas???

Somehow I managed to not let her know I had drawn her name.......I give myself pats on the back for that.

I decided to make her a Booty Bag that she could use for whatever purpose she wanted. They can be made in just about any size and used for evening bags to utility bags - depending on what they are made out of or how they are embellished.

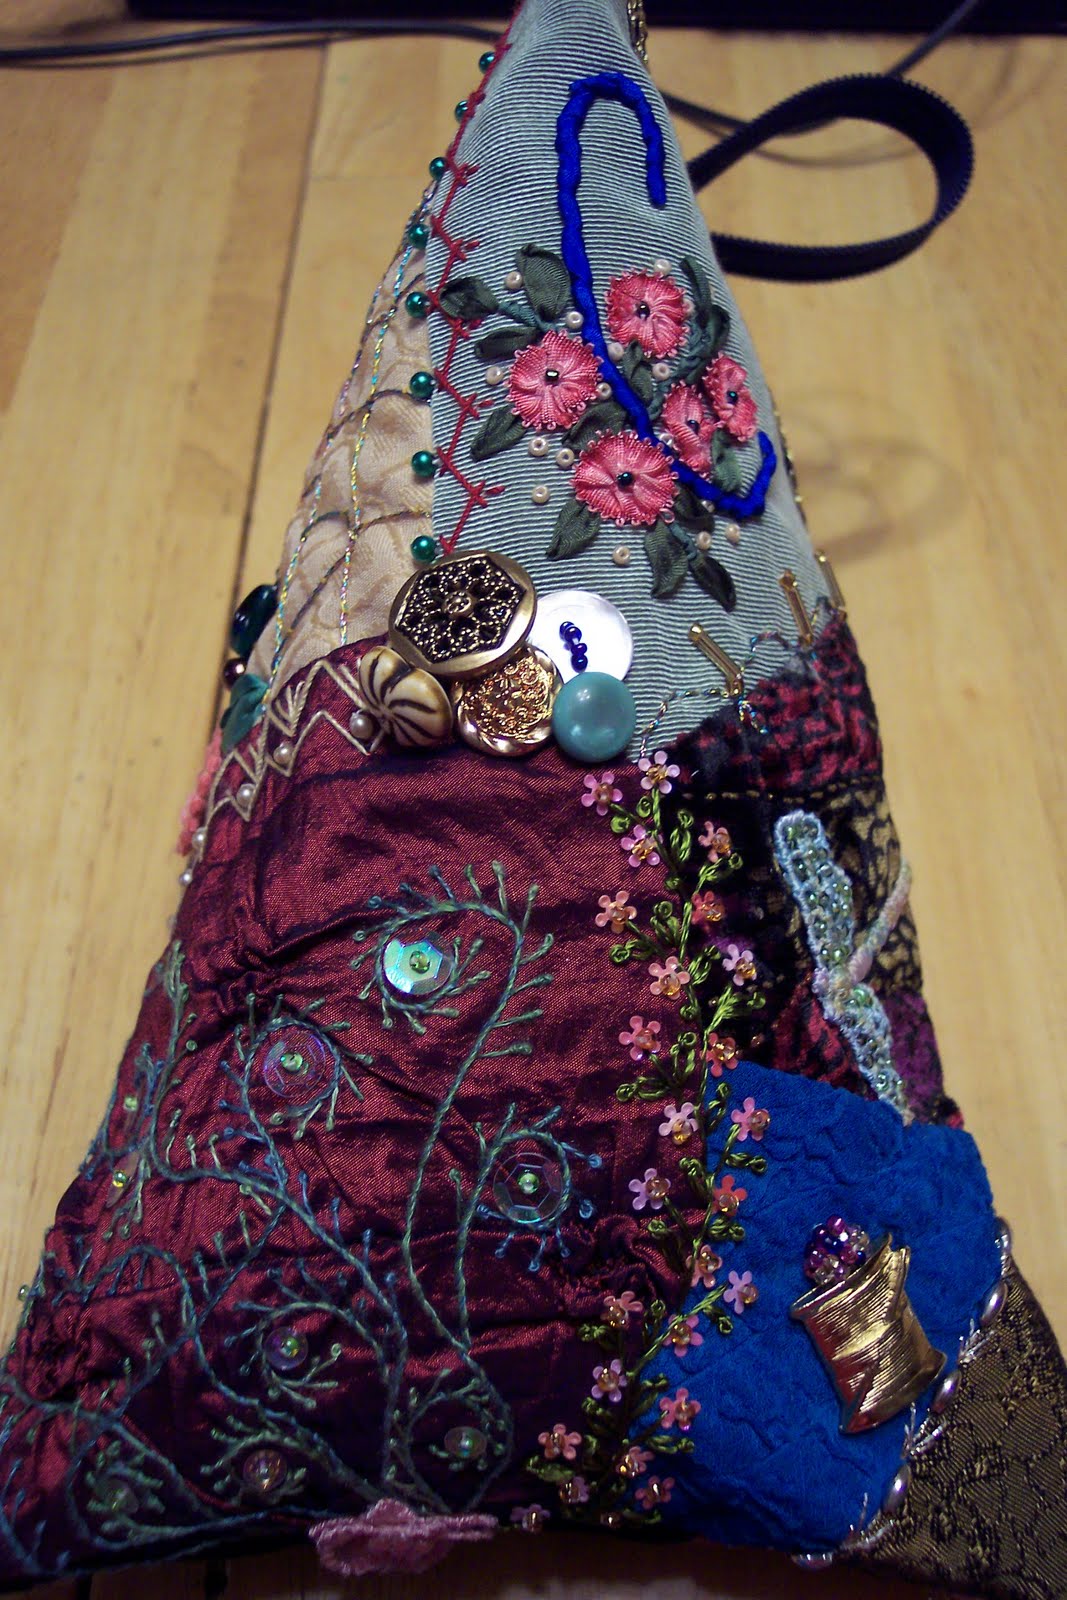
I chose to use mostly jewel tones and black in fancy fabrics. I found a piece of a velvet vest front with a multi-colored swirling pattern in it. I used this and the feather to pull my other fabrics selections. I stitched it with silk threads and silk ribbon. I hand dyed some small lace motifs and set about creating the CQ block.


Connie and I spent a day recently doing some decoupaged buttons and I remembered that she liked this one little lady. So, I made a beaded cabochon for her.

I added her initial in silk ribbon so some unscrupulous friend (like me) wouldn't take the bag away from her or just keep it, LOL! I used some vintage ombre ribbon from the 1930's to make the little flowers because we had been together when I bought that ribbon in Niwot, Colorado. I added the free hand swirls and sequins to try and repeat the feeling of a peacock tail.


Here is one more picture of the bag showing the hand dyed dragonfly and a better color shot of that beautiful velvet that I used as my inspiration fabric. In the next picture is a small flower lace motif that I also hand dyed for the bag.


When I put the feather in place it tied the whole bag together. The "Touche" is a personal joke so I can't share that but the label is from a ladie's dress. I save a lot of those because the names are cool and they can be used like this on a crazy quilt.


I don't know how well it shows up in that first picture but I also added a real peacock feather at the base of the applique feather. This is my interpretation of how to show we are birds of a feather who flock together.......ROFLOL!!!

Moon will tell you that Connie had to pry this out of my hands the day I delivered it to her.

Hugs, Shari

Estate Sale Find

I recently went to an estate sale with my friend Connie. We found many wonderful stitching related items there and I felt I got a good bargain on everything. I would share pictures of what I picked up but it is the usual stuff: fabric, lace, patterns, a couple of old books, etc. I am sure I will find a way to use everything I bought.

The best buy of the day is this 8" x 8.5" crazy quilt block from 1904!


I actually saw another lady pick it up and set it down. I couldn't wait for it to be out of her hands. I snatched it right up and set it on my pile of goodies. I didn't even really look at the price right away. The date alone was enough for me to want it.

Connie and I took our gathered up goodies into the living room, sat down and began to weed out what we really wanted vs. what we might want to keep if we could still afford it after paying for what we just had to have. When I got to the CQ patch I let out a "Yippee". Connie looked at me and asked if I had just hit the jackpot. I handed her the quilt block.......it was marked 50 cents! Obviously no one who set up that sale knew what they had in this little treasure.

The back is a muslin foundation that is very much discolered with age but so neatly done that the little stitches look like small road maps for a doll's town. The knots are tiny and the stitches pretty much uniform. The thread colors are a bit brighter on the back than on the front so I imagine the back saw less sunlight wherever it had been stored. There is no evidence that the block was ever sewn into a quilt or other object.

The front has 3 dark wool patches (a man's coat?), 1 purple velvet patch, 1 red gabardine patch,1 beige oriental print damask-like patch and the rest are all pure silks. Only the gabardine has a shredded rend in it. The red silk patch (ladie's dress piece?) has 4 tiny holes in it might be bug related. Other than that the fabrics are still in very good condition.

The seam treatment stitches are all single stitch herringbone. They are done in perle cotton #12 or embroidery floss using 2 plies and there are some basting stitches around the outer edges done in cotton sewing thread.

I believe this quilt block might have been made for a Memory Quilt when someone was going to be moving from one place to another. The names/initials are done in tiny chain stitch. A few of the stitches have been snagged and are waving little flags of "hello" at me.

I wish I knew who the block had belonged to and more about the "girls" Mollie, Lula and Clara who signed the quilt. One set of initials is definitely JH. It is hard to tell if the other set is MH or HW. I am going to fanticize it is MH and that JH & MH were a newly married couple moving to another state......maybe the girls were little sisters of the bride?

I am looking for suggestions of how best to display this treasure.

Ever the romantic.........

Shari

Mug Rug Swap Completed

Remember the Stitchmap mug rug swap mentioned in my last post? Well, now I can reveal that I sent the chicken patterned one to Ruby in North Carolina, the coffee mug one to Mona in Southern California and the purple diagonal striped one to Michele in Texas! By all reports they enjoyed their mug rug and the extra goodies I sent - mugs to match with an assortment of teas.

I have also received all 3 of my swaps now. The first one that came was from Amber in Ohio. It is so sweet and completely reversible, having a pink rose print on one side and a pink polka dot print on the other. She also made me a matching fabric snack bowl and a darling pocketed booklet to hold my tea bags in! It looks like a needle book so it would be perfect to take with me to an EGA stitch-in. I really like the feminine look of this one. Of course, my grandaughter Grace did too! I will have to keep it away from her.


Ann in Nevada sent me a beautiful blue printed mug rug with a matching tin. The mug rug is embroidered with oodles of tiny French knots accenting the floral prints.


The tin has a top made of the same fabric and then embroidered in floss and silk ribbon. It held an assortment of teas but it would also be just the right size for my embroidery scissors! I could use this mug rug right by my computer and fill the tin with just enough candy for an evening of web surfing!!!


I actually have a matching blue pottery mug that says World's Best Grandma on it and it is like they are a matched set. Lovely work and so tactile. I love texture on my handstitched items. I tend to fondle the texture when I am thinking about things.

Last, but by no means least, was the mug rug received from Michele. It is in my favorite colors of purples and creams with touches of gold and blue. The fabrics are just beautiful and I have already given it a dedicated spot next to my lounge chair on the end table so I can use it when I am watching TV.


Many thanks to these generous ladies. I can tell they put a lot of thought and energy into making these mug rugs for me (not to mention the extra goodies!). I really appreciate their generosity.

Monday, May 23, 2011

Thursday, March 24, 2011

Mug Rug Swap

I am taking part in a Mug Rug Swap and it has been so much fun coming up with a concept for my swap pieces. I am not really talented with a sewing machine so I asked my BFF Maggie to help me learn to put on bias tape bindings. We got together the other day and she tried to teach me but I wasn't the best apprentice she's ever had. Her big computerized sewing machine scared the dickens out of me. Maggie finally suggested we opt to make the simpler "sandwich" style mug rug.

I gladly agreed. I think they turned out great. Each mug rug has a warm and natural batting inside which gives it a little body. There is a bit of quilting on each to hold the layers together. Of course, I sent along a few other little goodies but I don't want to show what they were because the ladies are followers of this blog and I don't want to spoil their whole surprise.

This first mug rug is constructed on a muslin foundation from selvedges generously donated to me by my friends who quilt and sew much more than I do. I love working with selvedges, I just don't like doing the sewing that is required to generate having my own, LOL. There is also a redwork style embroidery. I hope the recipient will enjoy this little matt, it is just the right size for use by the computer.


The second mug rug I made was also created using selvedges on a muslin base with a redwork style embroidery. This was a mix of patterns to get all the elements I wanted on the cup and for the steam lines. The difference is mainly in color, theme and the quilting stitches are the S curve lines in the selvedge strips rather than the straight stitch quilting stitches used above.


The third one is also selvedges on a muslin base but the muslin is entirely covered with the selvedges. I then took my passion for crazy quilting seam treatments and added a bunch of embroidery to each joining seam. This one feels very texturized when you run your hand over it and I am very happy with the way it turned out. The quilted lines run diagonally across 7 of the strips.


The swaps being sent to me should be arriving in the very near future. I will try to blog about them when they arrive.

If you haven't tried making one of these little matts I really recommend that you do so. They are fun, can be done in a wide variety of shapes and techniques. I plan on making more for gifts.

Shari

Wednesday, November 10, 2010

Lucky Me!

Kathy Shaw had the most wonderful giveaway just recently and I was one of the fotunate ones who won a prize. I would have been happy to have any prize she was giving away. Everything was beautiful. Kathy sure does know how to hostess a giveaway. Here is what I won:


This is a gorgeous Swarvorski crystal bracelet with a slide clasp.


These are fine silk cords from Judith Baker Montano's line. Yummy!

Thank you, Kathy. I am sure I will be able to put all of these great prizes to good use.

Hugs, Shari